2024. 7. 17. 13:31ㆍJAVA/Language
이 글은 모던 자바 인 액션 도서의 내용을 개인적으로 정리한 글입니다. 틀린 내용이 있을 수 있습니다.
1. 함수는 모든 곳에 존재한다
자바 8 이후부터 일급 함수를 지원합니다. 일급 함수란 함수를 일종의 값으로 취급하여 메서드 인수로 전달하거나 반환값으로 전달하는 함수를 의미합니다. 자바 8에서는 메서드 참조 또는 람다 표현식을 사용하여 함숫값을 메서드의 인수로 전달하거나 반환값으로 전달할 수 있습니다. 예를 들어 다음과 같이 메서드 참조를 이용하여 변수에 함숫값을 저장할 수 있습니다.
Function<String, Integer> strToInt = Integer::parseInt;
1.1 고차원 함수
고차원 함수는 여러 함수들의 순차적인 동작을 하나의 함수로 묶어서 새로운 함수로 표현하는 함수입니다. 고차원 함수를 사용하는 대표적인 사례는 Comparator를 이용한 정렬이 있습니다. 예를 들어 학생들을 정렬할 때 학생들의 점수를 기준으로 오름차순으로 정렬하고 점수가 동일한 학생들에 대해서는 이름을 기준으로 오름차순으로 정렬한다고 합니다. 이러한 경우 다음과 같이 코드를 작성할 수 있습니다.
public class Main {
	public static void main(String[] args) {
		List<Student> students = new ArrayList<>();
		students.add(new Student("lee", 50));
		students.add(new Student("kim", 50));
		students.add(new Student("park", 70));

		Comparator<Student> comp = Comparator.comparing(Student::getScore)
			.thenComparing(Student::getName);
		students.sort(comp);
		System.out.println(students); // output: kim, lee, park
	}
}
위 코드와 같이 Comparator.comparing 메서드를 이용하여 여러 정렬 기준을 하나로 묶어서 comp라는 이름의 고차원 함수를 생성합니다.
부작용과 고차원 함수
고차원 함수나 메서드를 구현할 때 어떤 인수가 전달될지 알 수 없으므로 인수가 부작용을 포함할 가능성을 염두에 두어야 합니다. 인수로 전달된 함수가 어떤 부작용을 포함하게 될지 정확하게 문서화하는 것이 좋습니다. 물론 부작용을 포함하지 않을 수 있다면 가장 좋을 것입니다.
1.2 커링
함수형 프로그래밍에서 커링이라는 기술은 여러개의 인수를 받는 함수를 1개 인수로 받을 수 있도록 하는 새로운 함수를 만드는 기법입니다. 예를 들어 다음 코드는 섭씨를 화씨로 변환하는 예제입니다.
public class Main {
	public static void main(String[] args) {
		double celsius = 40;
		double fahrenheit = converter(celsius, 9.0/5, 32);
		System.out.println(fahrenheit); // output: 104.0
	}

	private static double converter(double x, double f, double b){
		return x * f + b;
	}
}
converter 메서드에서 x는 변환하려는 값이고, f는 변환 요소, b는 기준치 조정 요소입니다. 위와 같은 코드를 구현하여 섭씨를 화씨로 변환할 수 있습니다. 그런데 만약 새로운 요구사항으로 온도가 아닌 킬로미터에서 마일 등의 단위로 변환해야 한다고 합니다. 이때 convert 메서드를 다시 호출하여 다음과 같이 호출하는 방법이 있습니다.
double mi = converter(1000, 0.6214, 0);
System.out.println(mi); // 621.4
하지만 위와 같은 방법은 적절하지 않을 수 있습니다. 왜냐하면 킬로미터에서 마일로 변환하기 위해서는 메서드를 호출할때마다 인수 f에 0.6214, 인수 b에 0을 전달해야 하기 때문입니다. converter와 같은 메서드를 호출할때마다 값을 전달할때 잘못된 값을 전달할 가능성이 존재하고 값을 전달하는 것 또한 귀찮고 가독성 또한 나쁜 문제가 있습니다.
위와 같은 문제를 해결하기 위한 단순한 방법은 각각을 변환하는 메서드를 별도로 만드는 것입니다. 예를 들어 단위를 변환하는 메서드를 다음과 같이 구현할 수 있습니다.
static double convertCtoF(double x){
	return x * 9.0 / 5 + 32;
}

static double convertUSDtoGBP(double x){
	return x * 0.6 + 0;
}

static double convertKmtoMi(double x){
	return x * 0.6214 + 0;
}
하지만 위와 같은 방법의 문제점은 변환 요소와 기준치 조정 요소에 대해서 유연하지 못하고 3개의 메서드가 코드가 중복되는 문제점을 가지고 있습니다.
위와 같은 문제를 해결하기 위해서 커링이라는 기법을 활용해서 한개의 인수(x)를 갖는 변환 함수를 생성하는 코드를 구현합니다.
private static DoubleUnaryOperator curriedConverter(double f, double b){
		return (double x) -> x * f + b;
}
위와 같은 코드를 기반으로 구현한 예제는 다음과 같습니다.
public class Main {
	public static void main(String[] args) {
		double celsius = 40;
		DoubleUnaryOperator convertCtoF = curriedConverter(9.0/5, 32);
		DoubleUnaryOperator convertUSDtoGBP = curriedConverter(0.6, 0);
		DoubleUnaryOperator convertKmtoMi = curriedConverter(0.6214, 0);

		double fahrenheit = convertCtoF.applyAsDouble(celsius);
		double gbp = convertUSDtoGBP.applyAsDouble(1000);
		double mi = convertKmtoMi.applyAsDouble(1000);

		System.out.println(fahrenheit); // output: 104.0
		System.out.println(gbp); // output: 600
		System.out.println(mi); // output: 	621.4
	}

	private static DoubleUnaryOperator curriedConverter(double f, double b){
		return (double x) -> x * f + b;
	}
}
위와 같이 curriedConverter 메서드를 호출하여 DoubleUnaryOperator 함수를 생성한 다음에 변환하려는 값(x)만을 전달하면 외부의 클라이언트는 내부가 어떻게 작동하는지 알지 않아도 변환된 값(fahrenheit, gbp, mi)을 받을 수 있습니다.
정리하면 커링이라는 기법을 이용하여 위 예제에서 3개의 인수를 받아야 할것을 1개의 인수로 받도록 하였습니다. 이 함수형 프로그래밍의 커링 기법을 활용하면 위 예제와 같이 여러개의 인수를 전달해야 할 것을 1개의 인수만을 전달할 수 있도록 할 수 있습니다.
2. 영속 자료구조
함수형 프로그래밍에서 말하는 영속 자료구조는 자료구조에 있는 객체들의 상태를 변경할 수 없는 자료구조를 의미합니다. 즉, 함수형 메서드에서는 전역 객체(자료구조)나 인수로 전달된 객체를 변경할 수 없다는 의미입니다. 이러한 영속 자료구조를 변경하지 못하도록 하는 이유는 메서드를 호출할때마다 객체의 상태가 달라져서 결과가 달라질 수 있으므로 함수형 프로그래밍의 참조 투명성에 위배되기 때문입니다. 다음 사례들을 보며 자료구조를 변경할때 발생할 수 있는 문제들을 확인해봅니다.
이 글에서 설명하는 자료구조는 자바 언어의 객체와 같은 의미로 사용하고 있습니다.
2.1 파괴적인 갱신과 함수형
다음 코드는 A에서 B까지 기차여행을 의미하는 가변 TrainJourney 클래스입니다. 해당 클래스는 단방향 연결 리스트로 구현되어 있습니다. 주목할 점은 TrainJourney 클래스는 다음 여행 구간을 가리키는 TrainJourney 타입의 onward 필드에 의존합니다.
public class TrainJourney {
	public int price;
	public TrainJourney onward;

	public TrainJourney(int price, TrainJourney onward) {
		this.price = price;
		this.onward = onward;
	}

	@Override
	public String toString() {
		return "TrainJourney{" +
			"price=" + price +
			", onward=" + (onward != null ? onward.toString() : "null") +
			'}';
	}

	...
}
위 코드를 기반으로 X에서 Y까지 여행을 나타내는 객체를 생성하고 Y에서 Z까지의 여행을 나타내는 객체를 생성합니다. 코드로 구현하면 다음과 같습니다.
TrainJourney journeyXY = new TrainJourney(1000, null);
TrainJourney journeyYZ = new TrainJourney(1500, null);
위 2개의 여행은 중간지 Y가 포함되어 있기 때문에 논리적으로 연결하여 새로운 여행을 나타내는 객체를 생성할 수 있을 것입니다. 두 여행을 연결하기 위해서 다음과 같이 link 메서드를 구현합니다.
public static TrainJourney link(TrainJourney a, TrainJourney b){
	if (a == null){
		return b;
	}
	TrainJourney t = a;
	while (t.onward != null){
		t = t.onward;
	}
	t.onward = b;
	return a;
}
link 메서드를 사용하여 XY, YZ 여행을 연결합니다. 코드로 구현하면 다음과 같습니다. 코드로 구현한 다음에 XZ와 XY의 여행 객체를 각각 출력해봅니다.
public static void main(String[] args) {
		TrainJourney journeyXY = new TrainJourney(1000, null);
		TrainJourney journeyYZ = new TrainJourney(1500, null);
		TrainJourney journeyXZ = link(journeyXY, journeyYZ);
		System.out.println(journeyXZ); // output : TrainJourney{price=1000, onward=TrainJourney{price=1500, onward=null}}
		System.out.println(journeyXY); // output : TrainJourney{price=1000, onward=TrainJourney{price=1500, onward=null}}
}
TrainJourney{price=1000, onward=TrainJourney{price=1500, onward=null}}
TrainJourney{price=1000, onward=TrainJourney{price=1500, onward=null}}
위 실행 결과를 보면 문제가 되는 점이 있습니다. 그것은 jourenyXY 객체를 출력했을때 X→Y에 대한 여행이 아닌 X→Z에 대한 여행을 표현하고 있습니다. X→Y 여행에 대한 예상하는 결과값은 다음과 같았습니다.
TrainJoureny(price=1000, onward=null)
문제점
위 link 메서드로 인해서 인수로 전달한 jourenyXY 객체의 onward 상태값이 예상치 못하게 변경되었습니다. 이렇게 되면 journeyXY를 참조하고 있던 다른 클라이언트들은 의도치 않게 X→Z에 대한 여행으로 변경됩니다.
해결방법
기존 자료구조를 변경하지 않고 함수형 방식으로 link 메서드 호출시 반환하는 객체의 값을 그대로 인수 객체로 반환하는 것이 아닌 객체를 새로 생성하여 반환하도록 합니다. 코드로 표현하면 다음과 같습니다.
public static TrainJourney append(TrainJourney a, TrainJourney b){
	return a == null ? b : new TrainJourney(a.price, append(a.onward, b));
}
위 코드를 기반으로 실행한 예제는 다음과 같습니다.
public static void main(String[] args) {
	journeyXY = new TrainJourney(1000, null);
	journeyYZ = new TrainJourney(1500, null);
	journeyXZ = append(journeyXY, journeyYZ);
	System.out.println(journeyXZ); // output : TrainJourney{price=1000, onward=TrainJourney{price=1500, onward=null}}
	System.out.println(journeyXY); // output : TrainJourney{price=1000, onward=null}
}
TrainJourney{price=1000, onward=TrainJourney{price=1500, onward=null}}
TrainJourney{price=1000, onward=null}
실행 결과를 보면 journeyXY 객체의 onward는 변경되지 않고 null을 유지하는 것을 볼수 있습니다.
하지만 append 메서드의 주의할 점은 사용자 역시 append의 결과를 변경하지 말아야 합니다. 만약 append의 결과를 변경하면 시퀀스 b로 전달된 기차 정보도 변경됩니다. 예를 들어 코드로 구현하면 다음과 같습니다.
journeyXY = new TrainJourney(1000, null);
journeyYZ = new TrainJourney(1500, null);
journeyXZ = append(journeyXY, journeyYZ);
System.out.println(journeyXZ); // output : TrainJourney{price=1000, onward=TrainJourney{price=1500, onward=null}}
System.out.println(journeyXY); // output : TrainJourney{price=1000, onward=null}

// journeyYZ 객체 price 변경
journeyXZ.onward.price = 3000;
System.out.println(journeyYZ); // output : TrainJourney{price=3000, onward=null}
TrainJourney{price=1000, onward=TrainJourney{price=1500, onward=null}}
TrainJourney{price=1000, onward=null}
TrainJourney{price=3000, onward=null}
위 실행 결과를 보면 구조를 변경한 것은 journeyXZ 쪽인데 시퀀스 b로 전달한 journeyYZ의 price 값이 3000원으로 변경된 것을 볼 수 있습니다.
다음 그림은 위 예제에서 구현한 파괴적인 append와 함수형 append의 자료구조 그림입니다.
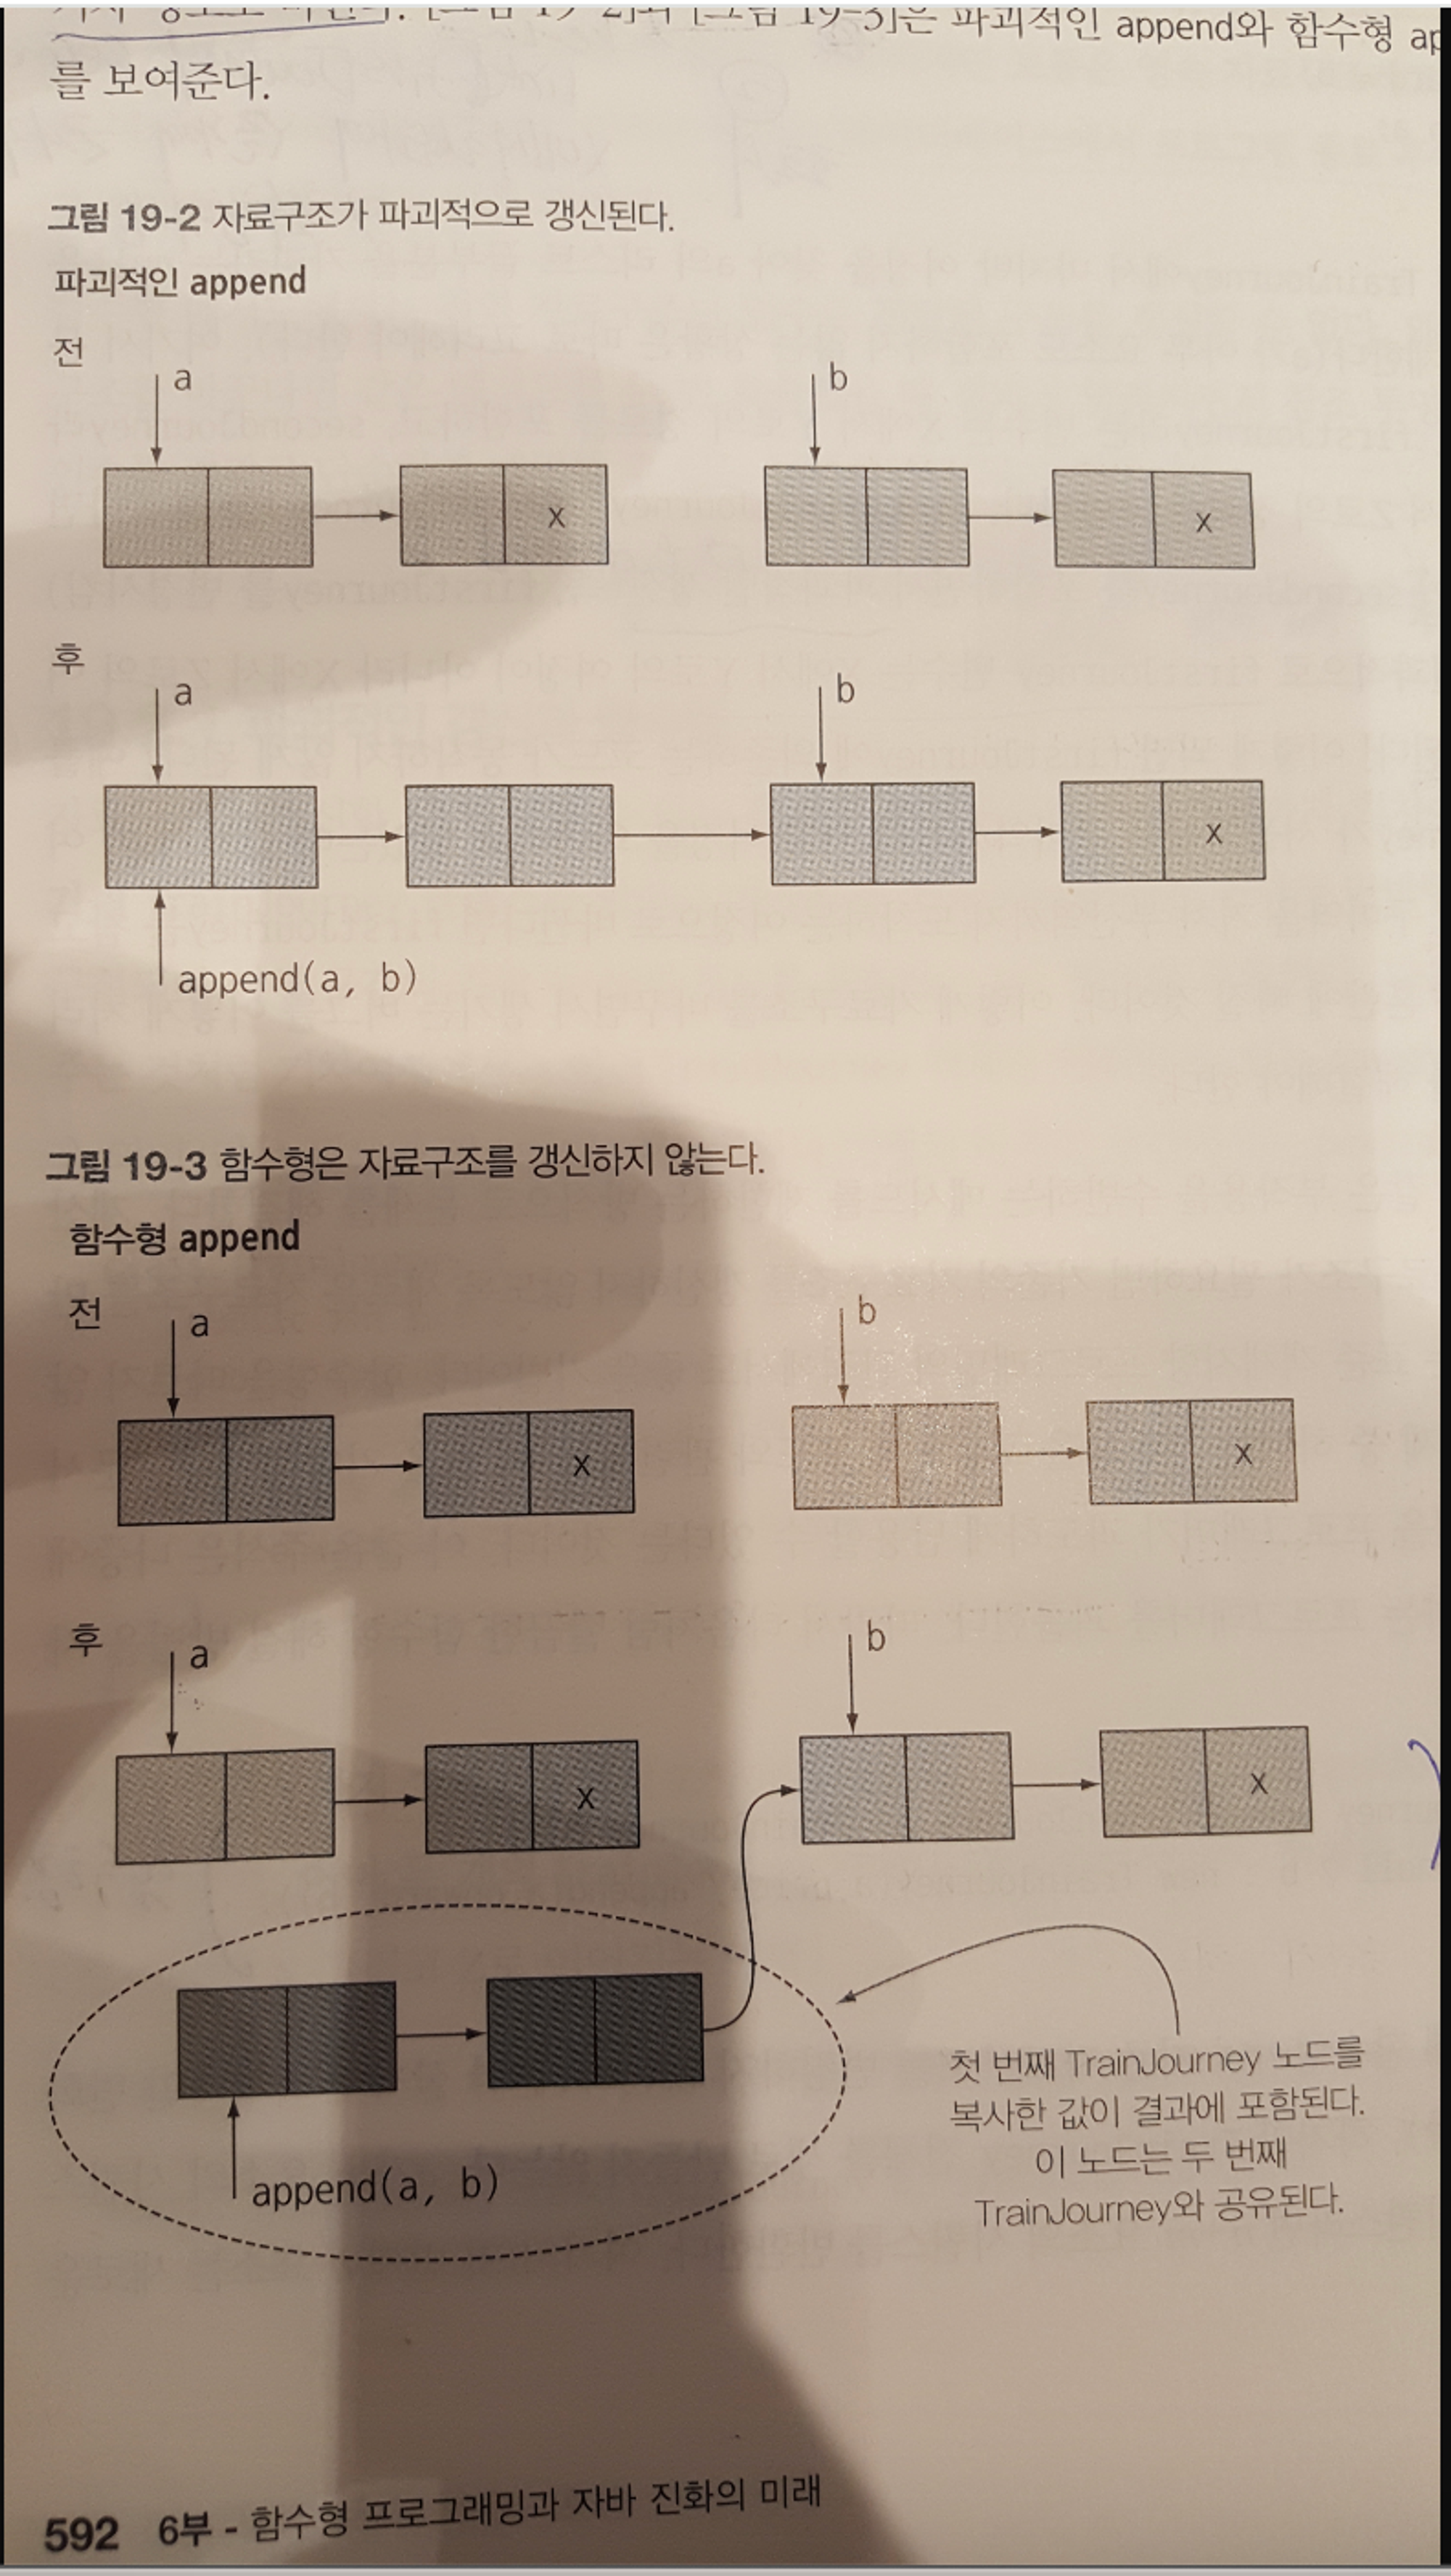
위 그림을 보면 파괴적인 append는 append를 수행하고 난 이후 a 시퀀스에 영향을 미쳐서 b와 연결된 것을 볼수 있습니다. 반면 함수형 append에서는 첫번째 a 시퀀스를 복사한 값이 b 시퀀스와 연결된 것을 볼수 있습니다.
위 예제를 통하여 알게된 사실은 함수형 프로그래밍 또는 메서드를 구현시 인수로 전달되는 객체(자료구조)의 상태를 변경하지 않도록 하는 것이 중요하다는 사실을 알게 되었습니다.
2.2 트리를 사용한 다른 예제
이번에는 예를 들어 key:이름, value:키 값을 저장할 수 있는 트리 자료구조가 있습니다. 코드로 표현하면 다음과 같습니다.
public class Tree {
	private String key;
	private int value;
	private Tree left, right;

	public Tree(String key, int value, Tree left, Tree right) {
		this.key = key;
		this.value = value;
		this.left = left;
		this.right = right;
	}

	@Override
	public String toString() {
		return "Tree{" +
			"key='" + key + '\\'' +
			", value=" + value +
			", left=" + left +
			", right=" + right +
			'}';
	}
	// ...
}
그리고 위 Tree 객체를 이용하여 Tree 객체의 value 값을 변경하는 update 메서드가 있습니다.
static class TreeProcessor{
	public static Tree update(String key, int newValue, Tree tree){
		if (tree == null){
			tree = new Tree(key, newValue, null, null);
		}else if (key.equals(tree.key)){
			tree.value = newValue;
		}else if (key.compareTo(tree.key) < 0){
			tree.left = update(key, newValue, tree.left);
		}else{
			tree.right = update(key, newValue, tree.right);
		}
		return tree;
	}
}
위 TreeProcessor의 update 메서드를 사용하여 key값에 일치하는 노드의 값을 변경하는 예제는 다음과 같습니다.
public static void main(String[] args) {
	Tree a = new Tree("a", 150, null, null);
	Tree b = new Tree("b", 160, null, null);
	Tree c = new Tree("c", 170, null, null);
	b.left = a;
	b.right = c;

	Tree result = TreeProcessor.update("b", 155, b);
	System.out.println(result); // Tree{key='b', value=155, left=Tree{key='a', value=150, left=null, right=null}, right=Tree{key='c', value=170, left=null, right=null}}
	System.out.println(b); // Tree{key='b', value=155, left=Tree{key='a', value=150, left=null, right=null}, right=Tree{key='c', value=170, left=null, right=null}}
}
Tree{key='b', value=155, left=Tree{key='a', value=150, left=null, right=null}, right=Tree{key='c', value=170, left=null, right=null}}
Tree{key='b', value=155, left=Tree{key='a', value=150, left=null, right=null}, right=Tree{key='c', value=170, left=null, right=null}}
위 실행 결과를 보면 인수로 전달된 b Tree의 value 값 또한 155로 변경된 것을 볼수 있습니다. 이는 update 메서드에서 인수 tree가 null이 아닌 경우에는 인수로 전달된 객체의 value 상태값을 변경한 다음에 반환하기 때문입니다.
위 예제를 통해서 알수 있는 사실은 메서드를 잘못 구현하면 메서드로 객체를 전달할때 인수로 전달한 객체의 상태값이 변경될 수 있다는 것을 알수 있습니다.
2.3 함수형 접근법 사용
위 Tree 객체를 사용한 update 메서드 문제를 해결하기 위해서는 우선 새로운 키/값 쌍을 저장할 새로운 노드를 만들어야 합니다. 또한 트리의 루트에서부터 새로 생성할 노드의 경로까지에 있는 중간 노드들도 새로 만들어야 합니다. 함수형 메서드로 개선한 fupdate 메서드는 다음과 같습니다.
public static Tree functionalUpdate(String key, int newValue, Tree tree){
	return (tree == null) ?
		new Tree(key, newValue, null, null) :
			key.equals(tree.key) ?
				new Tree(key, newValue, tree.left, tree.right) :
			key.compareTo(tree.key) < 0 ?
				new Tree(tree.key, tree.value, functionalUpdate(key, newValue, tree.left), tree.right) :
				new Tree(tree.key, tree.value, tree.left, functionalUpdate(key, newValue, tree.right));
}
위 코드를 사용하여 생성한 예제는 다음과 같습니다.
public static void main(String[] args) {
	Tree a = new Tree("a", 150, null, null);
	Tree b = new Tree("b", 160, null, null);
	Tree c = new Tree("c", 170, null, null);
	b.left = a;
	b.right = c;
	result = TreeProcessor.functionalUpdate("b", 155, b);
	System.out.println(result); // Tree{key='b', value=155, left=Tree{key='a', value=150, left=null, right=null}, right=Tree{key='c', value=170, left=null, right=null}}
	System.out.println(b); // Tree{key='b', value=160, left=Tree{key='a', value=150, left=null, right=null}, right=Tree{key='c', value=170, left=null, right=null}}
}
Tree{key='b', value=155, left=Tree{key='a', value=150, left=null, right=null}, right=Tree{key='c', value=170, left=null, right=null}}
Tree{key='b', value=160, left=Tree{key='a', value=150, left=null, right=null}, right=Tree{key='c', value=170, left=null, right=null}}
위 실행 결과를 보면 인수로 전달된 b Tree 객체의 value값이 160으로 유지된 것을 볼수 있습니다.
update 메서드와 functionalUpdate 메서드의 차이
update 메서드는 모든 사용자가 같은 자료구조를 공유합니다. 이는 누군가 Tree 객체를 수정하면 다른 사용자의 Tree 객체에도 영향을 미칩니다. 반면 functionalUpdate 메서드는 순수한 함수형 메서드입니다. functionalUpdate 메서드에서는 새로운 Tree 객체를 생성하여 반환합니다. 하지만 인수를 이용해서 가능한 한 많은 정보를 공유합니다.
위 예제의 Tree와 같은 함수형 자료구조를 영속(저장된 값이 다른 누군가에게 의해 영향을 받지 않은 상태)라고 하며 functionalUpdate 메서드가 인수로 전달된 자료구조를 변화시키지 않을 것이라는 사실을 확신할 수 있습니다. 하지만 조건은 “모든 사용자는 결과 자료구조를 바꾸지 않는다”라는 조건을 가지고 있습니다. 만약 위 예제에서 result Tree 객체의 result.right Tree 객체의 value 값을 임의로 190으로 변경한다면 b.right Tree 객체의 value 상태값도 변경됩니다.
위와 같은 값의 임의 변경 문제를 해결하기 위해서 Tree 객체의 key, value, left, right 필드에 final 키워드를 선언하여 불변 객체로 만들게 되면 “기존 구조를 변화시키지 않는다”라는 규칙을 만족할 수 있습니다. 또한 final 키워드를 붙인 또 다른 객체 또한 해당 객체의 필드 값에도 final을 적절히 사용해야할 것입니다.
3. 스트림과 게으른 평가
이번장에서는 스트림의 제약인 단 한번만 소비할 수 있다는 제약 때문에 어떤 문제가 발생하는 알아봅니다.
3.1 자기 정의 스트림
다음 예제는 스트림을 이용하여 정수 스트림을 생성하고 입력으로 들어오는 정수값이 소수인지 판별하고 n개의 소수를 출력하는 예제입니다.
public class MyMathUtils {

	public static Stream<Integer> primes(int n){
		return Stream.iterate(2, i->i+1)
			.filter(MyMathUtils::isPrime)
			.limit(n);
	}

	public static boolean isPrime(int candidate){
		int candidateRoot = (int)Math.sqrt(candidate);
		return IntStream.rangeClosed(2, candidateRoot)
			.noneMatch(i->candidate % i == 0);
	}

	public static void main(String[] args) {
		Stream<Integer> primes = MyMathUtils.primes(10);
		primes.forEach(p->System.out.printf("%d ", p)); // 2 3 5 7 11 13 17 19 23 29
	}
}
2 3 5 7 11 13 17 19 23 29
위 코드 실행시 2 부터 존재하는 10개의 소수를 출력합니다.
하지만 위 코드의 문제점은 후보 수(candidate number)로 정확히 나누어 떨어지는지 매번 모든 수를 반복 확인했다는 점입니다. 이론적으로 소수로 나눌수 있는 모든 수는 제외할 수 있습니다.
다음은 소수로 나눌 수 있는 수를 제외하는 과정입니다.
- 소수를 선택할 숫자 스트림이 필요하다
- 스트림에서 첫번째 수(스트림의 head)를 가져옵니다. 이 숫자는 소수입니다.(처음에 이 숫자는 2)
- 이제 스트림의 꼬리(tail)에서 가져온 수로 나누어 떨어지는 모든 수를 걸러 제외시킵니다.
- 이렇게 남은 숫자만 포함하는 새로운 스트림에서 소수를 찾습니다. 이제 1번부터 다시 이 과정을 반복합니다.
위 과정을 코드로 구현하면 다음과 같습니다.
public class MyMathUtils {
	public static IntStream numbers(){
		return IntStream.iterate(2, n->n+1);
	}

	public static int head(IntStream numbers){
		return numbers.findFirst().getAsInt();
	}

	public static IntStream tail(IntStream numbers){
		return numbers.skip(1);
	}

	public static IntStream primes(IntStream numbers){
		int head = head(numbers);
		return IntStream.concat(
			IntStream.of(head),
			primes(tail(numbers).filter(n -> n % head != 0))
		);
	}

	public static void main(String[] args) {
		IntStream primes = primes(numbers());
		primes.forEach(p->System.out.print(p + " "));
	}
}
위 예제를 실행하면 예상과는 다르게 에러가 발생합니다.
Exception in thread "main" java.lang.IllegalStateException: stream has already been operated upon or closed
에러가 발생한 원인은 스트림은 두번 이상 소비할 수 없기 때문에 위 코드에서 head 메서드를 수행하고난 이후 소비되어서 tail 메서드 수행시 에러가 발생합니다.
또한 추가적인 문제는 concat 메서드에 두번째 인수를 전달하기 위해서 primes 메서드를 재귀적으로 호출하는데 베이스 케이스가 없기 때문에 무한 재귀 상태에 빠지게 됩니다.
즉, 정리하면 첫번째 문제는 스트림의 소비는 1회이기 때문에 tail 메서드를 수행할 수 없고 두번째 문제는 베이스 케이스가 없기 때문에 primes 메서드를 재귀적인 호출시 무한 재귀에 빠지게 되는 문제가 있습니다.
3.2 게으른 리스트 만들기
위 문제를 해결하기 위해서 스트림의 게으른 연산(Lazy Evaluation)을 이용합니다. 게으른 연산은 스트림에 일련의 연산을 적용하면 연산이 수행되지 않고 일단 저장됩니다. 스트림에 최종 연산을 적용해서 실제 계산을 해야 하는 상황에서만 실제 연산이 이루어집니다. 이러한 일련의 연산에는 filer, map, reduce 연산 등이 있습니다. 이와 같은 게으른 특성 때문에 각 연산별로 스트림을 탐색할 필요 없이 한번에 여러 연산을 처리할 수 있습니다.
이번장에서는 기본적인 연결 리스트를 구현해보고 이 연결 리스트를 기반으로 게으른 리스트를 구현합니다. 그리고 이렇게 구현한 게으른 리스트 자료구조를 이용하여 이전장에서 알아본 소수 문제를 해결해봅니다.
기본적인 연결 리스트
다음 코드는 기본적인 연결 리스트 코드입니다.
public interface MyList<T> {
	T head();

	MyList<T> tail();

	default boolean isEmpty(){
		return true;
	}
}

public class Empty<T> implements MyList<T>{
	@Override
	public T head() {
		throw new UnsupportedOperationException();
	}

	@Override
	public MyList<T> tail() {
		throw new UnsupportedOperationException();
	}

	@Override
	public String toString() {
		return "Empty{}";
	}
}

public class MyLinkedList<T> implements MyList<T>{
	private final T head;
	private final MyList<T> tail;

	public MyLinkedList(T head, MyList<T> tail) {
		this.head = head;
		this.tail = tail;
	}

	@Override
	public T head() {
		return head;
	}

	@Override
	public MyList<T> tail() {
		return tail;
	}

	@Override
	public boolean isEmpty() {
		return false;
	}

	@Override
	public String toString() {
		return "MyLinkedList{" +
			"head=" + head +
			", tail=" + tail +
			'}';
	}

	public static void main(String[] args) {
		MyList<Integer> myList = new MyLinkedList<>(5, new MyLinkedList<>(10, new Empty<>()));
		System.out.println(myList);
	}
}
MyLinkedList{head=5, tail=MyLinkedList{head=10, tail=Empty{}}}
기본적인 게으른 리스트
게으른 리스트를 구현하기 위해서 Supplier<T> 함수형 인터페이스를 활용합니다. Supplier 함수를 사용하면 실제 호출할때 객체를 생성하기 때문에 리스트의 꼬리(tail)가 모두 메모리에 존재하지 않게 할 수 있습니다. 이 함수형 인터페이스를 이용하여 게으른 리스트를 다음과 같이 구현할 수 있습니다.
public class LazyList<T> implements MyList<T> {

	private final T head;
	private final Supplier<MyList<T>> tail;

	public LazyList(T head, Supplier<MyList<T>> tail) {
		this.head = head;
		this.tail = tail;
	}

	@Override
	public T head() {
		return head;
	}

	@Override
	public MyList<T> tail() {
		return tail.get();
	}

	@Override
	public boolean isEmpty() {
		return false;
	}

	public static void main(String[] args) {
		LazyList<Integer> numbers = from(2);
		int two = numbers.head();
		int three = numbers.tail().head();
		int four = numbers.tail().tail().head();
		System.out.println(two + " " + three + " " + four); // 2 3 4
	}

	public static LazyList<Integer> from(int n){
		return new LazyList<>(n, () -> from(n + 1));
	}
}
2 3 4
위 예제에서 numbers 리스트는 tail() 메서드를 실제 호출하기 전까지는 메모리 위에 실제 값이 올라가지 않습니다.
소수 생성으로 돌아와서
위에서 구현한 LazyList 클래스를 이용하여 소수 문제를 해결 해봅니다.
public class MyMathUtils {

	public static void main(String[] args) {
		LazyList<Integer> numbers = from(2);
		int two = primes(numbers).head();
		int three = primes(numbers).tail().head();
		int five = primes(numbers).tail().tail().head();
		System.out.println(two + " " + three + " " + five); // 2 3 5
	}

	public static LazyList<Integer> from(int n){
		return new LazyList<>(n, () -> from(n + 1));
	}

	public static MyList<Integer> primes(MyList<Integer> numbers){
		return new LazyList<>(
			numbers.head(),
			()->primes(numbers.tail().filter(n-> n % numbers.head() != 0)
			)
		);
	}
}
2 3 5
from 메서드를 수행하면 LazyList 객체를 생성하게 되는데 tail 인자 부분에 Supplier<MyList<Integer>> 타입의 함수형 인터페이스를 전달합니다. 위 함수형 인터페이스를 이용하여 실제 실행되면 스트림과는 다르게 한번 소비하는 것이 아닌 호출시 객체를 생성하여 반환합니다.
primes 메서드를 수행하면 인수로 받은 numbers 리스트를 이용하여 소수 리스트를 다시 생성합니다. 해당 메서드를 수행시 tail 인자 부분에 동일한 타입의 함수형 인터페이스를 전달합니다. from 메서드와 다른 것은 filter 연산을 적용하여 head의 값으로 나누어 떨어지는 것은 제외하도록 합니다.
게으른 필터 구현
LazyList는 filter 메서드를 구현하지 않았으므로 다음과 같이 구현합니다
@Override
public MyList<T> filter(Predicate<T> p){
	return isEmpty() ?
		this :
		p.test(head()) ?
			new LazyList<>(head(), () -> tail().filter(p)) :
			tail().filter(p);
}
4. 패턴 매칭
일반적으로 함수형 프로그래밍을 구분하는 특징으로 구조적인 패턴 매칭이 있습니다. 예를 들어 수학에서는 다음과 같은 정의를 할 수 있습니다.
f(0) = 1
f(n) = n*f(n-1)
하지만 자바에서는 위와 같은 정의를 하기 위해서는 if-then-else나 switch문을 사용하여 구현해야 합니다. 또한 자료형이 복잡해지면서 이러한 작업을 처리하는데 필요한 코드양도 증가합니다. 패턴 매칭을 사용하면 이러한 불필요한 잡동사니를 줄일 수 있습니다.
다음 예제는 숫자와 바이너리 연산자로 구성된 간단한 수학언어를 코드로 구현한 예제입니다.
public class Expression {
	public interface Expr{}

	public static class Number implements Expr{
		private final int value;

		public Number(int value) {
			this.value = value;
		}

		@Override
		public String toString() {
			return Integer.toString(value);
		}
	}

	public static class BinOp implements Expr{
		private final String opName;
		private final Expr left;
		private final Expr right;

		public BinOp(String opName, Expr left, Expr right) {
			this.opName = opName;
			this.left = left;
			this.right = right;
		}

		@Override
		public String toString() {
			return String.format("(%s%s%s)", left, opName, right);
		}
	}

	public static Expr simplifyExpression(Expr expr){
		if (expr instanceof Number){
			return expr;
		}
		if (expr instanceof BinOp){
			BinOp binOp = (BinOp)expr;
			Expr left = simplifyExpression(binOp.left);
			Expr right = simplifyExpression(binOp.right);

			if (left instanceof Number && right instanceof Number){
				if ("+".equals(binOp.opName)){
					int leftValue = ((Number)left).value;
					int rightValue = ((Number)right).value;
					if (rightValue == 0){
						return new Number(leftValue);
					}
				}
			}
			return new BinOp(binOp.opName, left, right);
		}
		return expr;
	}

	public static void main(String[] args) {
		Expr seven = new BinOp("+", new Number(7), new Number(0));
		Expr five = new BinOp("+", new Number(2), new Number(3));
		// (7 + 0) + (2 + 3)
		Expr twelve = new BinOp("+", seven, five);
		System.out.println("Original Expression: " + twelve);
		Expr simplifiedExpression = simplifyExpression(twelve);
		System.out.println("Simplified Expression: " + simplifiedExpression);
	}
}
Original Expression: ((7+0)+(2+3))
Simplified Expression: (7+(2+3))
위 실행 결과를 보면 7+0 표현식을 7로 단순화한 것을 볼 수 있습니다. 하지만 자바 언어에서 위와 같은 단순화를 하기 위해서는 예제와 같이 많은 코드를 구현할 수 밖에 없습니다.
4.1 방문자 디자인 패턴
자바에서는 방문자 디자인 패턴으로 자료형을 언랩할 수 있습니다. 특히 특정 데이터 형식을 방문하는 알고리즘을 캡슐화하는 클래스를 따로 만들 수 있습니다.
다음은 위 예제에서 방문자 디자인 패턴으로 변경한 예제 코드입니다.
public class Expression {
	public interface Expr{
		Expr accept(SimplifyExprVisitor v);
	}

	public static class Number implements Expr{
		private final int value;

		public Number(int value) {
			this.value = value;
		}

		@Override
		public Expr accept(SimplifyExprVisitor v) {
			return v.visit(this);
		}

		@Override
		public String toString() {
			return Integer.toString(value);
		}
	}

	public static class BinOp implements Expr{
		private final String opName;
		private final Expr left;
		private final Expr right;

		public BinOp(String opName, Expr left, Expr right) {
			this.opName = opName;
			this.left = left;
			this.right = right;
		}

		@Override
		public Expr accept(SimplifyExprVisitor v) {
			return v.visit(this);
		}

		@Override
		public String toString() {
			return String.format("(%s%s%s)", left, opName, right);
		}
	}

	public static class SimplifyExprVisitor{
		public Expr visit(Number number){
			return number;
		}

		public Expr visit(BinOp binOp){
			Expr left = binOp.left.accept(this);
			Expr right = binOp.right.accept(this);

			if (left instanceof Number && right instanceof Number){
				if ("+".equals(binOp.opName)){
					int leftValue = ((Number)left).value;
					int rightValue = ((Number)right).value;
					if (rightValue == 0){
						return new Number(leftValue);
					}
				}
			}
			return new BinOp(binOp.opName, left, right);
		}
	}

	public static void main(String[] args) {
		Expr seven = new BinOp("+", new Number(7), new Number(0));
		Expr five = new BinOp("+", new Number(2), new Number(3));
		// (7 + 0) + (2 + 3)
		Expr twelve = new BinOp("+", seven, five);
		SimplifyExprVisitor visitor = new SimplifyExprVisitor();
		System.out.println("Original Expression: " + twelve);
		Expr simplifiedExpression = twelve.accept(visitor);
		System.out.println("Simplified Expression: " + simplifiedExpression);
	}
}
Original Expression: ((7+0)+(2+3))
Simplified Expression: (7+(2+3))
위 예제를 보면 SimplifyExprVisitor 객체를 이용하여 덧셈 표현식을 인수로 받은 경우 왼쪽 표현식(7+0)과 오른쪽 표현식(2+3)에 재귀적으로 방문(Number 또는 BinOp 객체를 거침)하여 단순화를 시키는 것을 볼 수 있습니다. 그리고 덧셈 표현식의 왼쪽, 오른쪽 피연산자가 모두 숫자 타입이고 오른쪽 값이 0인 경우에 왼쪽 피연산자 값으로 단순화시킨 것을 출력 결과를 통해서 확인할 수 있습니다.
위 예제에서는 오른쪽 피연산자의 값이 0인 경우에만 단순화를 시켰지만 왼쪽 피연산자에 대해서도 단순화시키는 코드를 추가할 수 있으며, 덧셈만이 아닌 뺄셈, 곱셉, 나눗셈과 같은 연산에 대해서 단순화를 시키기 위해서 코드를 추가할 수 있습니다. 하지만 이전 설명과 같이 자바 언어에서는 스칼라 언어와는 다르게 패턴 매칭을 지원하지 않기 때문에 위 예제와 같이 많은 코드를 작성할 수 밖에 없다는 단점을 가지고 있습니다.
4.2 패턴 매칭의 힘
자바 언어에서는 패턴 매칭을 지원하지 않습니다. 하지만 스칼라 언어에서는 패턴 매칭을 지원할 수 있습니다.
def simplifyExpression(expr: Expr): Expr = expr match{
	case BinOp("+", e, Number(0)) => e // 0 더하기
	case BinOp("*", e, Number(1)) => e // 1 곱합기
	case BinOp("/", e, Number(1)) => e // 1 나누기
	case _ => expr // expr 단순화 할 수 없음
}
스칼라 언어에서는 위와 같은 패턴 매칭을 지원하기 때문에 자바 언어처럼 커다란 switch문이나 if-then-else 문을 피할 수 있습니다.
자바로 패턴 매칭 흉내 내기
위에서 스칼라 언어로 지원하는 패턴 매칭을 자바 언어로 다음과 같이 구현할 수 있습니다.
public class Expression {
	public interface Expr{}

	static class BinOp implements Expr{
		private String opName;
		private Expr left;
		private Expr right;

		public BinOp(String opName, Expr left, Expr right) {
			this.opName = opName;
			this.left = left;
			this.right = right;
		}

		@Override
		public String toString() {
			return String.format("(%s%s%s)", left, opName, right);
		}
	}

	static class Number implements Expr{
		private int value;

		public Number(int value) {
			this.value = value;
		}

		@Override
		public String toString() {
			return Integer.toString(value);
		}
	}

	public static Expr simplify(Expr e){
		TriFunction<String, Expr, Expr, Expr> binOpCase = (opName, left, right)->{
			Expr simplifyLeft = simplify(left);
			Expr simplifyRight = simplify(right);

			if ("+".equals(opName)){
				if (simplifyLeft instanceof Number){
					int leftValue = ((Number)simplifyLeft).value;
					if (leftValue == 0){
						return simplifyRight;
					}
				}
				if (simplifyRight instanceof Number){
					int rightValue = ((Number)simplifyRight).value;
					if (rightValue == 0){
						return simplifyLeft;
					}
				}
				return new BinOp(opName, simplifyLeft, simplifyRight);
			}
			if ("*".equals(opName)){
				if (simplifyLeft instanceof Number){
					int value = ((Number)left).value;
					if (value == 1){
						return simplifyRight;
					}
				}
				if (right instanceof Number){
					int value = ((Number)right).value;
					if (value == 1){
						return simplifyLeft;
					}
				}
				return new BinOp(opName, simplifyLeft, simplifyRight);
			}
			if ("/".equals(opName)){
				if (right instanceof Number){
					int value = ((Number)right).value;
					if (value == 1){
						return simplifyLeft;
					}
				}
				return new BinOp(opName, simplifyLeft, simplifyRight);
			}
			return new BinOp(opName, simplifyLeft, simplifyRight);
		};
		Function<Integer, Expr> numCase = Number::new;
		Supplier<Expr> defaultCase = ()->new Number(0);
		return patternMatchExpr(e, binOpCase, numCase, defaultCase);
	}

	static <T> T patternMatchExpr(
		Expr e,
		TriFunction<String, Expr, Expr, T> binOpCase,
		Function<Integer, T> numCase,
		Supplier<T> defaultCase){
		if (e instanceof BinOp){
			BinOp binOp = (BinOp)e;
			String op = binOp.opName;
			Expr left = binOp.left;
			Expr right = binOp.right;
			return binOpCase.apply(op, left, right);
		}else if (e instanceof Number){
			int value = ((Number)e).value;
			return numCase.apply(value);
		}else{
			return defaultCase.get();
		}
	}

	public static void main(String[] args) {
		Expr sevenPlusZero = new BinOp("+", new Number(7), new Number(0));
		Expr fiveMultiplyOne = new BinOp("*", new Number(5), new Number(1));
		// (7 + 0) + (5 * 1)
		Expr twelve = new BinOp("+", sevenPlusZero, fiveMultiplyOne);
		System.out.println("Original Expression: " + twelve);
		Expr result = simplify(twelve);
		System.out.println("Simplified Expression: " + result);

		// (7 + 1) + 0
		Expr sevenPlusOne = new BinOp("+",new Number(7), new Number(1));
		Expr zero = new Number(0);
		Expr eight = new BinOp("+", sevenPlusOne, zero);
		System.out.println("Original Expression: " + eight);
		result = simplify(eight);
		System.out.println("Simplified Expression: " + result);

		// (7 + 1) / 1
		sevenPlusOne = new BinOp("+",new Number(7), new Number(1));
		Expr one = new Number(1);
		eight = new BinOp("/", sevenPlusOne, one);
		System.out.println("Original Expression: " + eight);
		result = simplify(eight);
		System.out.println("Simplified Expression: " + result);
	}
}
Original Expression: ((7+0)+(5*1))
Simplified Expression: (7+5)
Original Expression: ((7+1)+0)
Simplified Expression: (7+1)
Original Expression: ((7+1)/1)
Simplified Expression: (7+1)
5. 기타 정보
5.1 캐싱 또는 기억화
트리 형식으로 트리에 존재하는 노드의 개수를 계산하는 computeNumberOfNodes(Range)라는 부작용이 없는 메서드가 있습니다. 트리 객체 자체는 불변 객체이지만, computeNumberOfNodes 메서드를 호출할때마다 트리를 재귀적으로 탐색해야 해서 노드 계산 비용이 비싸다는 문제를 가지고 있습니다. 정리하면 해당 객체의 사용에는 다음과 같은 특징을 가지고 있습니다.
- 외부의 클라이언트에서 해당 트리에 반복적으로 접근하여 computeNumberOfNodes 메서드를 호출합니다.
- 트리 및 노드는 불변 객체입니다.
- computeNumberOfNodes 메서드의 실행 비용은 비쌉니다.
해결방법
트리가 참조 투명성을 지키기 때문에 캐싱을 통해서 해결할 수 있습니다. 메서드에 래퍼로 캐시(HashMap)를 추가하게 되면 우선 인수에 따른 결과가 존재하는지 캐시를 먼저 확인합니다. 만약 결과값이 이미 존재한다면 캐시된 결과값을 반환하고 없다면 computeNumberOfNodes 메서드를 호출하여 결과값을 캐시에 저장하고 반환합니다.
위 설명을 기반으로 구현한 예제 코드는 다음과 같습니다.
public class Tree {
	private final String key;
	private final int value;
	private final Tree left, right;
	public Tree(String key, int value, Tree left, Tree right) {
		this.key = key;
		this.value = value;
		this.left = left;
		this.right = right;
	}

	public boolean isInRange(int start, int end) {
		return value >= start && value <= end;
	}

	public Tree getLeft() {
		return left;
	}

	public Tree getRight() {
		return right;
	}
}
public class Range{
	private final int start;
	private final int end;

	public Range(int start, int end) {
		this.start = start;
		this.end = end;
	}

	// Tree의 value가 start와 end 사이에 있는지 여부
	public boolean isInRange(Tree tree) {
		return tree.isInRange(start, end);
	}

	public int getStart() {
		return start;
	}

	public int getEnd() {
		return end;
	}

	@Override
	public boolean equals(Object object) {
		if (this == object)
			return true;
		if (object == null || getClass() != object.getClass())
			return false;
		Range range = (Range)object;
		return start == range.start && end == range.end;
	}

	@Override
	public int hashCode() {
		return Objects.hash(start, end);
	}

	@Override
	public String toString() {
		return "Range{" +
			"start=" + start +
			", end=" + end +
			'}';
	}
}
public class TreeCaching {
	private final Map<Range, Integer> numberOfNodes = new HashMap<>();

	public Integer computeNumberOfNodesUsingCache(Tree tree, Range range){
		Integer result = numberOfNodes.get(range);
		if (result != null) {
			System.out.println("Using cache range" + range);
			return result;
		}
		result = computeNumberOfNodes(tree, range);
		numberOfNodes.put(range, result);
		return result;
	}

	private Integer computeNumberOfNodes(Tree tree, Range range) {
		if (tree == null){
			return 0;
		}
		int count = 0;
		if (range.isInRange(tree)){
			count = 1;
		}
		count += computeNumberOfNodes(tree.getLeft(), range);
		count += computeNumberOfNodes(tree.getRight(), range);
		return count;
	}

	public static void main(String[] args) {
		Tree lee = new Tree("lee", 40, null, null);
		Tree park = new Tree("park", 60, null, null);
		Tree kim = new Tree("kim", 50, lee, park);

		TreeCaching treeCaching = new TreeCaching();
		Integer result = treeCaching.computeNumberOfNodesUsingCache(kim, new Range(50, 60));
		System.out.println(result); // 2

		result = treeCaching.computeNumberOfNodesUsingCache(kim, new Range(50, 60));
		System.out.println(result); // 2
	}
}
2
Using cache rangeRange{start=50, end=60}
2
위 실행 결과를 보면 50~60점 사이의 범위에 대해서는 첫번째 computeNumberOfNodesUsingCache 메서드의 반환값으로 2가 나왔고 두번째 메서드 호출에 대해서는 위 출력 결과와 같이 캐시된 값을 사용한 것을 볼수 있습니다.
하지만 위 코드의 numberOfNodes 해시맵의 문제점이 존재합니다. 문제점은 다음과 같습니다.
- numberOfNodes는 가변 상태이기 때문에 동기화되지 않아서 스레드 안정성이 없습니다.
위와 같은 문제점으로 인하여 잠금으로 보호되는 HashTable이나 잠금 없이 동시 실행을 지원하는 ConcurrentHashMap을 사용할 수 있지만 다중 코어에서 numberOfNodes를 동시에 호출하면 성능이 크게 저하될 수 있습니다. 왜냐하면 맵에 range가 있는지 찾는 과정과 range 객체, 노드수 entry를 맵에 추가하는 동작 사이에 레이스 컨디션이 발생할 수 있기 때문입니다.
가장 좋은 방법은 함수형 프로그래밍을 사용해서 동시성과 가변 상태가 만나는 상황을 완전히 없애는 것입니다. 하지만 함수형 프로그래밍을 사용해서 동시성과 가변 상태가 만나는 상황을 제거하여 코드의 명확성과 안정성은 높여주지만 성능 최적화를 위한 캐싱과 같은 문제를 해결해주지 못합니다. 캐싱은 상태를 저장하고 변경하는 메커니즘을 필요로 하기 때문에 함수형 프로그래밍의 불변성과 순수 함수 개념과 충돌 할 수 있습니다. 이를 해결하려면 함수형 프로그래밍을 적절히 유지하면서 캐싱을 구현하는 것이 필요합니다.
5.2 “같은 객체를 반환함”은 무엇을 의미하는가?
위 예제에서 computeNumberOfNodesUsingCache 메서드에 인수로 전달한 Range 객체는 물리적으로 같은 객체가 아닌 각각 별도로 생성하여 전달하였습니다. 하지만 캐시맵에서는 둘이 같은 객체라고 판단하여 Range 객체에 해당하는 캐시된 노드 개수값을 반환하였습니다. 이는 두 Range 객체가 물리적으로 서로 다른 값을 가지고 있지만 필드 상태값이 같은 값을 가지면 논리적으로 같은 객체라고 판단한다는 의미입니다.
즉, 같은 객체를 반환한다는 의미는 물리적으로 서로 다른 객체일 수 있지만 상태값이 같은 논리적으로 같은 객체를 반환한다는 것을 의미합니다. 다음 예제는 Range 객체의 비교 예제입니다.
Range range1 = new Range(50, 60);
Range range2 = new Range(50, 60);
System.out.println(range1 == range2);
System.out.println(range1.equals(range2));
false
true
위와 같은 예제를 기반으로 함수형 프로그래밍의 참조 투명성이냐 아니냐를 판단하는 기준은 반환된 객체의 물리적인 값이 아닌 구조적인 값이 같은 객체냐 아니냐를 판단하는 것입니다. 만약 구조적인 값이 같아서 같은 객체를 반환했을 때 해당 함수는 참조 투명성을 갖는다고 말할 수 있습니다.
5.3 콤비네이터
콤비네이터란 두 함수를 인수로 받아서 다른 함수로 반환하는 등의 함수를 조합하는 기능입니다. 이러한 함수를 고차원 함수로도 불린다. 대표적인 콤비네이터로는 CompletableFuture 클래스의 thenCombine 메서드가 있습니다. thenCombine 메서드는 CompletableFuture와 BiFunction 두 인수를 받아서 새로운 CompletableFuture를 생성합니다.
다음은 함수 조합(function composition)이라는 개념을 보여주는 코드입니다.
static <A,B,C> Function<A,C> compose(Function<B,C> g, Function<A,B> f){
	return x-> g.apply(f.apply(x));
}
compose 함수는 함수 f와 g를 인수로 받아서 f의 기능을 적용한 다음에 g의 기능을 적용하는 함수를 반환합니다. 이 함수를 이용하면 콤비네이터로 내부 반복을 수행하는 동작을 정의할 수 있습니다.
예를 들어 데이터를 받아서 함수 f에 연속적으로 n번 적용하는 루프가 있습니다.
public class Main {
	public static void main(String[] args) {
		Function<Integer, Integer> function = repeat(3, (Integer x)-> 2*x);
		Integer result = function.apply(10);
		System.out.println(result); // 80
	}

	private static <A> Function<A, A> repeat(int n, Function<A, A> f) {
		return n == 0 ? x -> x : compose(f, repeat(n-1, f));
	}

	public static <A,B,C> Function<A, C> compose(Function<B, C> g, Function<A, B> f){
		return x -> g.apply(f.apply(x));
	}
}
80
위 예제와 같이 콤비네이터 기법을 활용하면 클라이언트가 내부 반복을 알지 않아도 수행할 수 있도록 정의할 수있습니다.
6. 마치며
- 일급 함수란 인수로 전달하거나, 결과로 반환하거나, 객체에 저장할 수 있는 함수입니다.
- 고차원 함수란 한개 이상의 함수를 인수로 받아서 다른 함수로 반환하는 함수입니다. 자바 언어에서는 comparing, andThen, compose 등의 고차원 함수를 제공합니다.
- 커링은 함수를 모듈화하고 코드를 재사용할 수 있도록 지원하는 기법입니다.
- 함수를 모듈화한다는 의미는 큰 함수나 복잡한 기능을 더 작거나 독립된 부분으로 나누어 관리하고 재사용 가능하게 만든다는 것을 의미합니다.
- 영속 자료구조는 갱신될 때 기존 버전의 자신을 보존합니다. 결과적으로 자신을 복사하는 과정이 따로 필요하지 않습니다.
- 영속 자료구조는 변경 시 기존 자료구조를 수정하지 않고 새로운 자료구조를 생성합니다. 이 과정에서 기존 버전의 일부를 재사용(구조적 공유)하여 효율성을 유지합니다.
- 자바의 스트림은 스스로 정의할 수 없습니다.
- 예를 들어 Stream<Integer> stream = new Stream() 과 같은 방식으로 스트림을 직접 정의하거나 생성할 수 없습니다.
- 스트림은 항상 데이터 소스로부터 파생되어야 합니다. 데이터 소스를 통해 스트림을 생성하고, 그 스트림을 통해서 일련의 연산을 수행되어야 합니다.
- 게으른 리스트는 자바 스트림보다 비싼 버전으로 간주 할 수 있습니다. 게으른 리스트는 데이터를 요청할 때 Supplier를 이용해서 요소를 생성합니다. Supplier는 자료구조의 요소를 생성하는 역할을 수행합니다.
- 패턴 매칭은 자료형을 언랩하는 함수형 기능입니다. 자바의 switch 문을 일반화 할 수 있습니다.
- 참조 투명성을 유지하는 상황에서는 계산 결과를 캐시할 수 있습니다.
- 콤비네이터는 둘이상의 함수나 자료구조를 조합하는 함수형 개념입니다.
References
모던 자바 인 액션
'JAVA > Language' 카테고리의 다른 글
| 모던 자바 인 액션: 함수형 관점으로 생각하기 (0) | 2024.07.15 |
|---|---|
| 다형성(Polymorphism) (0) | 2023.04.23 |
| 객체지향 언어 특징 (캡슐화, 상속, 추상화, 다형성) (0) | 2023.03.29 |
| Mokito 모듈을 이용한 Random 객체 통제하기 (0) | 2023.03.10 |
| [Java][Optional] Optional의 위험 및 사용 가이드 (0) | 2022.11.28 |